
Chances are you invest time and effort in getting your designs right. As a graphic designer, I know from experience the planning and energy spent combing through the details and finally reaching an approval from your client. The last thing you want is for the design to come back from the printers with unexpected results. Unless you’ve worked in a print shop, most designers have limited experience in sending designs for print. Here I can explain the fundamentals that you need to know, the rest you can leave up to the expertise of the printer!

RGB vs. CMYK
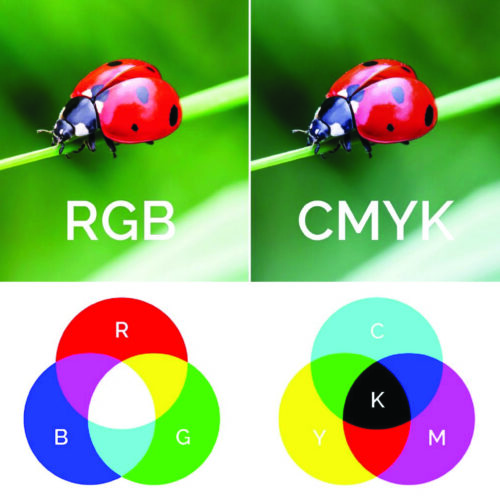
The system that your computer software uses for generating colour on screen is not the same system that printers use. What you see on a computer screen has a much larger colour space, meaning there are a lot more colour hues that can be achieved. This is called RGB for Red, Green and Blue.
Your first important step is to design in the colour space that printers use which is CMYK – Cyan, Magenta, Yellow and K for Black. However, even working in CMYK, what you see on screen won’t always be exactly what you’ll see on the printed product. That’s why proofing your designs is so important.
Resolution
On screen your resolution is not so much of an issue however when it comes to printing you will need at least 300 dots per inch/pixels per inch. Most images that you see on websites are optimized for web and are set at a resolution of 72 pixels per inch.
Be sure to set the resolution of your file at 300 pixels per inch. If you are designing in Photoshop, this is especially important. I’ve had a customer design everything at 72 pixels per inch (web setting) and there is no way to increase resolution after the fact. You can always start with a higher resolution and downsample to a lower resolution – not the other way around! So it’s very important that you start at the proper resolution of 300 dpi/ppi. No sense in going any higher, it will just make your file larger.
The Need for Bleed
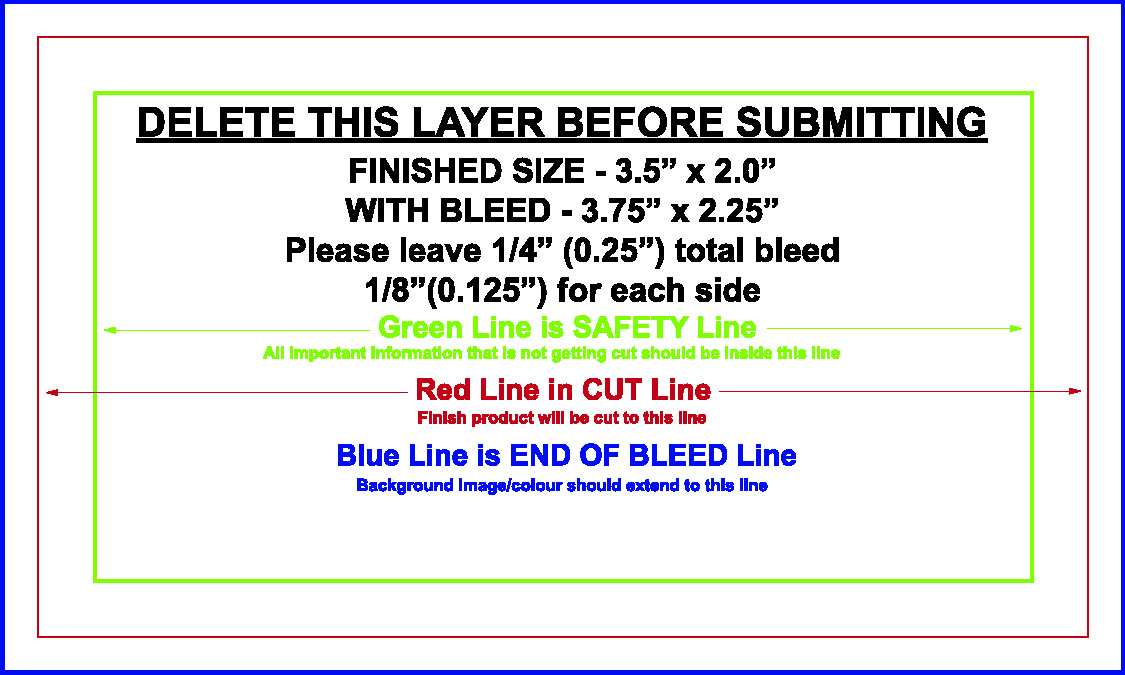
The “bleed” is the most important criteria your print job needs. The way a printer cuts the paper down is not an exact science, so designers have always left a little room around the edge of their designs as room for error.
There is not a printer on the planet that can or will print ink directly to the edge of the paper. The design is always printed on a larger piece of paper and then cut to actual size so whatever colours or photos that you want to print to the edge of your final design must extend past the trimming / cut line.
Each printer will set the bleed amount at different measurements so it’s important to ask before you start designing on the amount of bleed you need. A standard size however is .125” (1/8th) all the way around.
Margins
Another very important measurement to consider are your margins. A margin is the space from the edge of the page to where all of your important text starts. The thicker the margin, the easier it is for your printer to cut the design evenly.
I touched on this in the “bleed” section on how a printer cuts the paper down is not an exact science! The tighter your text is to the edge of the cut line (final size of the document) the harder it is to appear balanced.
We recommend of at least a .25” (1/4th) margin on standard size documents. We allow .075” (3/16th) for business cards.

Proofreading
We’ve all been there, just when you’ve double checked or even triple checked your design and you think it’s ready, you spot a spelling error. Proofreading sounds like obvious advice, but it cannot be stressed enough. Printing with a spelling error is simply silly and a waste of money – but it can happen.
It’s best to avoid the trouble by spending the time to go over everything thoroughly and get as many eyes as possible to look it over. Spellcheck will only get you 75% of the way there. It won’t pick up on many grammatical mistakes or notice if you misspell proper nouns. It’s best to have the mindset of what can go wrong will go wrong when it comes to proofreading.
Templates
A pro tip would be to connect with your printer for templates on the items you are designing. These templates will include the proper bleed and margins that you need so that you can spend less time worrying if you have the correct print specifications and more time proofreading.
A brochure template is a good example – many designers forget about the short panel of the brochure. This means that the page is not divided evenly and 1 panel is actually shorter in width than the other two panels. The short panel is designed for easy and seamless folding.
Borders
Borders can be a great addition to your design, but only if they are used correctly. A border that is too close to the safety margin is very hard for a printer to keep balanced. This reinforces the concept that the way a printer cuts the paper down is not an exact science.
To have the most success with your borders:
- Make sure to leave a larger margin so that it’s less apparent if the design is cut too short on one side.
- Creating the illusion of a completed border with decorative leaves or flowers on one side is also easier for your printer to cut evenly.
- Instead of framing the entire page, frame only a section – this is the most favorable among printers. It looks good and is easier for the printer to trim.
File Types
Designers have plenty of options to save their work in different formats. Here are the file types that printers can work from.
JPG (or JPEG): Most people will be familiar with this one, the default file format on many digital cameras. JPG’s must be saved with an appropriate resolution and in the correct colour space (CMYK for print and RGB for web).
PDF: Widely used, preserves the original content and appearance of a file regardless of where or how it is viewed.
EPS: most common for saving vector graphics to preserve their scalability; not always readable on PCs
PNG: high image quality that supports transparency/opacity.
TIFF: High image quality and large file size; TIFF files will never lose quality, even when compressed).
Software-Specific
PSD: an editable (raster-based) file created in Photoshop
AI: an editable (vector-based) file created in Adobe Illustrator
*Both Photoshop and Illustrator files are likely too large to send by email.
Canva: PNG, JPG or PRINT PDF. We see many design sent to us from Canva and if we need to modify the artwork to include a bleed, a PRINT PDF is preferred as an image is fixed and cannot be edited.
